High on Life: How to Defeat 9-Torg (Boss Fight)

This guide will show players how to defeat 9-Torg in High on Life.

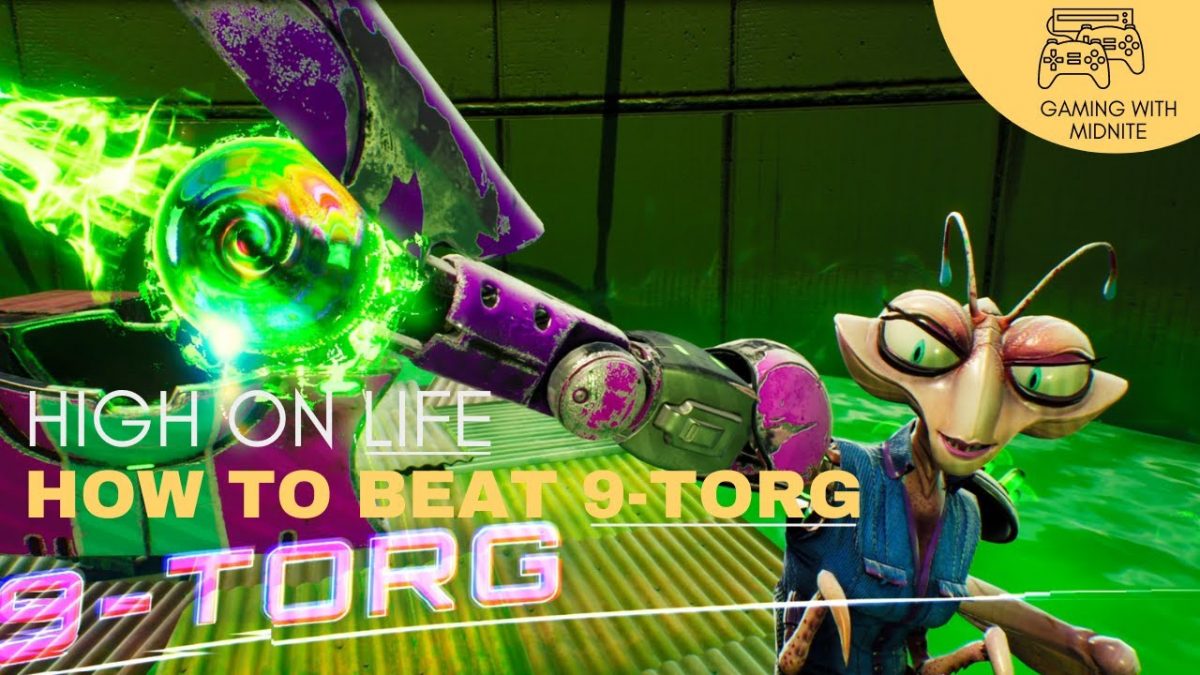
The mother of the Torg family, known as 9-Torg, is one of the first bosses that players in High on Life will run into. Given that this is the first fight you’ll encounter, the alien and its numerous clones can be challenging to defeat. Until the player goes to find all of the High on Life weapons, this boss will block their path. It will be difficult for the player to complete the first mission because they are just beginning their career as a bounty hunter. In order to overcome 9-Torg in High on Life, this tutorial will show players how to do so. Players can also purchase sufficient High on Life Accounts in the game.

How to beat 9-Torg in High on Life

Round 1: 9-Torg’s shooting attack

As she advances swiftly left or right, 9-Torg launches a firing attack to start the fight. The player can avoid her wide-area blaster rounds at first by moving around a lot and hiding behind the level’s boxes. She then explodes. She also provides a high-impact, green single with a ball shape that goes slowly and is simple to evade if players maintain their distance rather than attempting to attack with the Knifey.

It’s imperative to use Kenny as frequently as possible by aiming at the 9-Torg’s head. The glob-shot assault can also be used to knock her down so that the player can fast swing with the Knifey or attempt a mid-air juggle.

Round Two: How to Dodge 9-Torg’s Lasers

The 9-Torg will dive under the surrounding ooze after a blaster shot before unexpectedly popping out and stunning the player with a barrage of single horizontal and sporadically vertical green laser blasts.

Jumping over the laser will prevent any health loss, however trying to evade the laser will result in substantial damage. The likelihood of dying from devitrification increases significantly if you are hit by a laser. After the jump, keep firing here to keep depleting her health; be careful around any shattered floor tiles.

Round 3: How to Tether to Slime

Players must press the LB button on their Xbox controller in order to use the Knifey’s restraining ability to hold back the flying insects above before the 9-Torg’s final move, letting the lethal ooze rise, is made. Throughout the course, players must harness and swing from one bug to another until the slime levels return to normal, letting them to safely descend to the platform below.

The 9-Torg’s system

We won’t have many options as you currently only have Kenny and Knifey. However, Glob Shot juggling is an efficient technique to do a ton of damage to her if you get the hang of it.

When a Glob Shot explosion knocks her down, try to approach her for a good stab from Knifey.

You can try to hit her with a ball to knock her down or play with her in the air if she’s high up and being attacked by a laser beam.

You’ll receive the accomplishment First Bounty Down following the fight. After that, you’ll get the chance to take on a mystery boss. The detailed instructions for defeating 9-Torg in High on Life are provided above. Visit Topgmnews.com for more High on Life guides.

How to Use Kinetic Ore to Travel Distance in Fortnite

This guide will show players how to use Kinetic Ore to travel distance in Fortnite.

The first season of Fortnite Chapter 4 adds a ton of new features to the game, such as buggies, new areas, new weaponry, and augmented reality. Recently, Chapter 4 began, bringing with it the enigmatic Kinetic Ore. The Impact Hammer is both a lethal weapon and a superb navigating tool because it is an energy transfer substance. Players may learn how to use kinetic ore to cover ground in Fortnite by reading this article. To find kinetic ore, players must have enough Fortnite V-BUCKS prepared.

How to Use Kinetic Ore to Move Distance in Fortnite

With Kinetic Ores, long-distance travel is rather easy to achieve. Get near to the Kinetic Ore once you’ve located it and strike it with the pickaxe tool four to five times. After that, the kinetic ore will begin to fire an energy beam in the opposite direction from where you hit it. The key to this puzzle is to aim your gaze in the desired direction and strike the kinetic ore. Jumping on the stone slab will cause you to slingshot in the direction of the energy beam once the kinetic ore has built up enough energy. This will allow you to travel far during the energy collection process.

Where to Find Kinetic Ore in Fortnite

Chapter 4: Season 1 introduces the luminous physical rock known as the Kinetic Ore. When it is hit, if you haven’t already used it, it recharges before shooting. The ability to leap on it and launch it gives gamers a completely new fast-travel option.

Finding one of the enigmatic stones is the first step for Fortnite players who want to finish the Kinetic Ore travel quest. Players can try to find the Kinetic Ore whenever they arrive to the Shattered Slabs or select it as their landing location in Fortnite. This item is easily identifiable due to its dark blue tint. In order to defend oneself against adversaries, players can plunder the region for weapons and shields, although using harvesting equipment is all that is needed to move with kinetic ore the fastest.

The player must repeatedly hit the Kinetic Ore with their Harvester after selecting it. Players won’t need to worry about damaging Kinetic Ore because they’ll recognize that striking it won’t grant them materials like hitting other structures. In Fortnite, the ore will appear more purple towards color and will shoot a beam of propulsion energy in the direction the player is looking when they hit it seven or eight times using a harvesting equipment. At this stage, users can mount the ore and enter the energy ray to launch the kinetic ore in the direction they specify.

As soon as the Kinetic Ore in Fortnite strikes the earth or other structures while a player is flying, they will be shot down. In Fortnite, players can manipulate the direction the ore pulls them in order to avoid this and make sure they fly as far as possible. For instance, instead of staring directly at an ore, players should crouch and strike it at its highest point. By doing this, the ore’s jump becomes more vertical, enabling the player to ride it and go as far as possible in order to finish the “travel distance utilizing kinetic ore” objective as soon as feasible.

This concludes the detailed tutorial on using kinetic ore travel distance in Fortnite. Visit Topgmnews.com for more Fortnite tutorials.

All Illusory Walls in Elden Ring: Academy of Raya Lucaria

This guide will tell the player all the Illusory Wall locations in the Academy of Raya Lucaria in the Elden Ring.

One of the most enchanting places that Elden Ring players will go to is the Academy of Raya Lucaria. These hidden walls lead to areas in the game that frequently conceal rare items and even spells. Since the first Dark Souls, FromSoftware has enjoyed using illusory walls as a barrier to keep players from progressing, tricking them into believing there is a wall where there should be a clear route ahead. With the help of this tutorial, players will be able to prepare enough Cheap Elden Ring Runes for the game by knowing exactly where the Illusory Wall is located in the Academy of Raya Lucaria.

The First Raya Lucaria hidden wall

Two spell-casting foes await players at the top of the steps leading to the Cuckoo Chapel when they exit the elevator leading to Raya Lucaria’s Academy in the Elden Ring. The first secret tunnel in Raya Lucaria may be found by turning right as soon as you enter the church and hitting the western wall in front of you. A runic arc in front of a statue and multiple sarcophagi will be the result of this. If the player wears the Great Rune to experience its effects, they can use this unique item.

The Second Raya Lucaria Hidden Wall

Players of Raya Lucaria can access the second hidden entrance inside the Academy, close to the Grace Schoolhouse classrooms. The player can turn left in the corridor to find a room with an empty bookshelf right in front of the entrance as they enter Raya Lucaria Academy further away from the Land of Grace. The Blacksmithing Stone may be found on the balcony after hitting the bookshelf, which will show it to be a mirage[4].

The player can jump onto a platform from the balcony if they turn to the north. A mountainous platform with two Trina’s Lilies and some rocks close to the edge that the player can climb can be reached by following that ledge. The Olivinus Glintstone Crown, a helmet that boosts intelligence by three but depletes health by 9%, is another item that may be found near the top by continuing on and jumping over a gap. In Elden Ring, this helmet can be used to unlock the Converted Towers Puzzle.

The Third Raya Lucaria Hidden Wall

The Schoolhouse Classroom Site of Grace is followed by a living jar opponent and a number of wizards, whom the players will come across shortly. After ascending two flights of stairs in that room, turn left right away to find another empty bookcase. Similar as earlier, clicking on it will make Raya Lucaria’s hidden passageway visible. This passageway opens up to a room with a stone sword key and a chest holding comet magic. Players will also discover a ladder leading to the seemingly empty upper level close to the room’s entrance.

The player can explore another secret section in the Elden Ring by heading east on the second floor, jumping over a railing, and finding some damaged beams. Enter it and descend into the crawl area to find a room with a massive crystal array and an object in front of it. As soon as the artifact is looted, all of the dormant living jar opponents in the area will attack, therefore players should take care to defeat them before taking it. Players that want more Elden Ring information should visit Topgmnews.com.